

A couple of weeks ago in a comment someone asked me to do a step-by-step of one of my journal spreads. It probably would have been better to have taken pictures as I went along, but I didn't. Maybe this will be of interest to someone. I posted the page recipe to CompositionArtJournals a few days ago. I'll put it here in a separate post. You'll see that I didn't follow it very closely.
I sat down this morning intending to try out my latest page recipe, #3 borders. I picked my three items: first a newspaper ad that features my son. I've been meaning to put this in my journal for a couple of months and someone mentioning seeing it in the paper again on Thursday prompted me to dig for it in my box of "things to journal with". Next came a page from a notepad that I got in an ephemera swap. The paper color and feel made me consider it and the lines that went with the stripes on my son's shirt sealed the deal. My first two items being black and white,
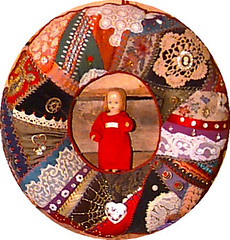
I was ready for some color. I decided I was in the mood for black, brown, red and white. I just needed a color photo to go with the scheme. On the floor was a magazine page with a great picture of buttons in frames hanging on a paneled wall. I had my three photos (sort of).
I glued the clipping on the left page and the button photo on the right and decided that I wanted my note paper to sit on top of the paint, so I just picked a position for it overlapping the button photo. I used a small brush and brown fluid acrylic to paint a narrow border around the clipping. Then I did the same around the button pic with black. Then again around the clipping with some red paint mixed with brown to tone it down a bit.
By this time I decided I needed one more photo, so it was back to my magazine. I found a great shot of circles of different fabrics. One paisley was perfect. I cut it out and glued it down behind where the note paper would go. My recipe called for three photos, but recipes are meant to be guides, not rules.
I painted another border of the red/brown around where the notepaper would go and a brown border around the paisley fabric circle. Next was a third border, off white this time around the clipping. I decided to just finish off the bottom of the left page in white thinking I could add more paint over the white if I wanted to. I added a white border next to the black around the button photo and above the notepaper.
Then a black border around the paisley and another black one in the lower right corner which I painted brown and added a stamped date in red/brown. That just left the center portion of the right page which I painted brown at the bottom and red/brown at the top. I didn't like that so I smeared some red over the brown area.
My recipe calls for stamping in the borders, so I picked out one of my favorite stamps which is just slice of an eraser cut with a serated knife. I stamped in black on the two red/brown borders. That made the borders really pop. I finally glued down the notepaper after I wrote on it.
The big white space was really bugging me, so I glued a strip of paper from an old book of sheet music. Around it I painted two narrow borders, brown and black. It seemed to still need more color, so I painted five red dots. I thought these would work with the buttons. The page was starting to come together, but I still wasn't happy with all of the white. There was a piece of needlepoint canvas laying on my work table and I put it over part of the white border and stamped black ink through that. It looked great, so I stamped all of the white borders on the spread. Wow, much better!
The last things I added were the strip of text, favorite things because it was laying on the table and seemed to fit; the circle punched brown paper on the paisley; a little bit of black next to the paisley to extend the line of black from the bottom of the page and a stamped date.
I liked the way it looked, but then I got the idea to sew on a real button. I usually don't put many things like this in my journal because they tend to make it hard to work on the later pages. I'll probably be sorry, but I love the way it looks.
I didn't notice until much later that the circle of paisley mimics the circular photo. I love it when things work out like that.
No comments:
Post a Comment